Buildings from next to nothing
I have a love of making stuff out of rubbish. It probably comes from my late father who had a habit of coming back from the pub with plastic milk crates and turning them into functional – if not aesthetically pleasing – furniture (footstools and whatnot). But I have to admit I find it difficult stopping myself.
It means that I don’t throw much away – but then few wargamers do, I guess. Every so often, though – and before it gets too full - the box of ‘tat’ has to be dug out and ‘useful’ things made from it.
The Slammers scenery I have built over the past decade or so has mostly come from just such a resource. Where I have used manufactured items – or should I say things actually made for the purposes of wargaming – I feel the need to adapt and modify it wherever I can, but mostly it’s been maid from rubbish.
And so it came to pass…
I had some boxes left over from buying Dragon 1/72 scale tanks. I’d accumulated the remains of a head mounted LED light I bought in a garage which never worked. The ‘dashboard mount’ for a miniature clock, weather station. Some buts of Airfix Mech/Robot thingies that I’d bought to get the track units out of. A medicine bottle. The bullet shaped dome (made of nice hard styrene) that I’d saved from a firework I launched on the millennium news years eve. The usual stuff…
The secret ingredient, though, were a few things I picked up at Salute from Antenociti's Workshop: some doors and packing cases and drums. Good doors that can be glued flat to an upright surface add great realism to any scratch built building and – sculpted by Old Crow (as far as I’m aware) these are amongst the best.
Bases
I started off cutting some sheet bextrene to shapes to mount the components on. I’d normally use 3mm but was running short to I cut two pieces of 1.5mm for both bases and then sandwiched them together with cyano-acrylate glue (the top one slightly smaller than the bottom one – like a contour map – just to aid in making the edges less prominent on the table top.
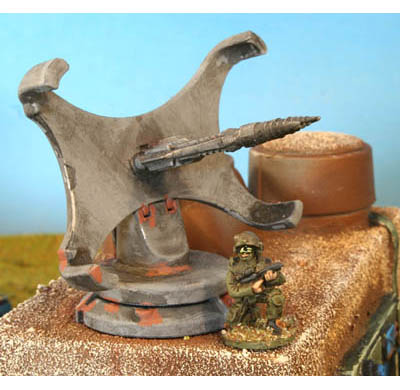
The first image on the construction page (IMG_1088) shows the layout of the first group of buildings: the ‘Control and Communications Centre’. There are two clear boxes (the model tank packaging) with a corner cut from one with the brown medicine bottle slotted into it. There’s a sort of conveyor belt arrangement made from 4 spare allen keys (self assembly furniture…) with a hatch bade from the base of a 1/35th scale toy Cyberman. That’s finished off with tank tracks on a car repair mesh platform. The cylindrical object on the medicine bottle is the LED head lamp carcass and the remains of that item form detail on the walls and roofs. The red mounted roof item is a bicycle rear light and the ‘sensor’ dish is the ‘dashboard mount’ I mentioned earlier with an Airfix Robot ‘thing’ pinned and stuck on it. All in four Antenociti doors have been added – two large and two small and their placement can be seen from the shots through to IMG_1096.
The second building – the Nuclear Reactor – can be seen constructed from IMG_1097 onwards. This has hald of a ‘tank packaging’ box stuck to the ‘firework rocket dome’ I mentioned earlier, with some pipework and a big Antenociti door. Other items of ‘dingle’ (as Jez of Old Crow tells me it’s called) include brass rod and more Airfix Mech/Robot gizmos. The small domes are from a batch I purchased for putting space ships in for my 3D Startrek game. Another Cyberman base fits the end of a sloped piece of styrene – part of the base from a Revell 1/72nd scale diec-ast F14 Tomcat, as I recall. The pictures up to IMG_1102 show the rest of the basic construction.
Wall textures and primer
I added a couple of other elements – mostly some ribbon cable for small scale pipe-work – and then coated the structures with grey automotive spray primer. Texture was then added to the walls that were intended to be made from concrete by painting the surfaces with PVA glue and sprinkling them with sand. Images IMG_1103 onwards show the buildings in this state.
Finishing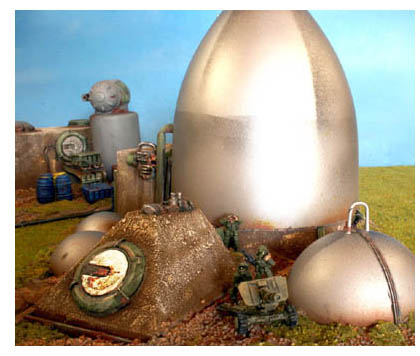
The buildings were sprayed with Tamiya colours from cans to give a brownish base colour for the walls and ground areas. The domes were masked and sprayed silver/aluminium, with some basic masks made to over spray some black just to break up the surfaces into some feeling of having been constructed from panels.
Crates (wooden and ‘techy’) and the SF barrels were assembles and painted in acrylics, as were the instrument panels for the doors (supplied with them as a separate white metal item).
Painting of details like doors was also done in water-based acrylics with rust added from both paint and weathering powders.
Basing and varnish
Basing used my favourite product: brown tile grout (flexible, easy to work with and pre-coloured) with sand and talus added over PVA glue to stick it down. For a change I used the Tac Glue supplied by Antenociti to stick down the flock with mixed results – or should I say mixed feelings about the results. It works better with the Flock supplied by Antenociti (not surprisingly, perhaps) than some other material I used (from a now long forgotten source).
Varnishing was carefully achieved using my dwindling supply of Testors Dullcoat – carefully sprayed from the can to avoid the shiny aluminium domes. This does a fantastic job of dulling down everything (obviously) plus holding lose material – chalks and so forth – onto the model. When the varnish was dry, I did then added metal scrapes in GW Mithril silver over the GW Boltgun metal that I had previously painted on as metal areas (and which had the shine removed by the Dullcoat. Lastly I added some shine to the computer screens on the doors using green Tamiya acrylic lacquer.
The photos
They are just quickly put together for the records. The figures are the GZG Slammer’s opponents from my toybox (Wolverines and Flaming Sword Commandos) with Old Crow Thunderbolt Division vehicles.
John Treadaway